Showing posts with label Workshop. Show all posts

Monday, 30 September 2019

Unicorn Jelly Ice Cream Stick(独角兽果冻棒)

After i show out my nephew birthday Jelly stick, one of my friend also want to learn it. Last weekend we go to my cousin house to have a Unicorn Jelly Woskshop. He teaching us step by step to made it. Normally we think making a jelly dessert just a simple way only. But if you made 3D jelly , that really different. It take a lot of time and your patient. If you rushing it, then the finishing will out of shape. 

Let's see what we have to prepare before we start it. Below recipe enough to made 32 stick jelly . 

Transparent Layer Ingredient :
- 1200ml Water 
- 170g Sugar 
- 10pcs Fresh Pandan Leaf ( Cut to small size)
- 1 1/2 tbsp Agar- agar powder ( Use Japanese brand is better , if cannot find just use normal one)

Coconut Milk Layer Ingredient :
- 900ml Water
- 300ml Pure Coconut Milk
- 10pcs Fresh Pandan Leaf ( Cut to small size)
- 170g Sugar
- 1 1/2 tbsp Agar- agar powder

** Remark: 1200ml , need 1 1/2 agar-agar powder**

Mold & Tools to prepare :
- 2 pcs 3D Flower Silicone Mold
- 2 pcs 3D Mini Leaf Silicone Mold
- 2 pcs 3D Horn Silicone Mold
- 4 pcs 4Cell Ice Cream Mold
- 1 pcs Tiger Mold ( Just use for the eyes of unicorn, if you can get others also can use)
- 32 pcs Ice Cream Stick
- 1 pcs 10ml syringe with needle


Color to prepare : 
- Pink Color 
- Charcoal Powder
- Blue Color
- Green Color
- Gold Color

Instruction :
Transparent Layer 
- Add in 1000ml water , 170g sugar and Pandan Leave into a small pot and start to boil
- Take a small cup add in 200 ml water with the 1 1/2 tbsp agar-agar powder and mix it well. 
- After the transparent water boiled, add in the agar-agar mixture and keep stir and cook about 5 min.
  Then close the fire and cover it and put aside. 

Coconut Milk Layer 
- Add in 800ml water , 170g sugar and Pandan Leave into a small pot and start to boil
- Take a small cup add in 100 ml water with the 1 1/2 tbsp agar-agar powder and mix it well. 
- After the boiled, add in the agar-agar mixture and keep stir and cook about 5 min.
- Then add in 300ml fresh & Pure coconut milk mix well then leave to fire , cover it and put aside.
** Remark : After add in coconut milk don't boil too long time,it will separate the coconut with the 
water and coconut milk become granules.

Filling up the Ice Cream Mold
We going to make 3 layer of Ice Cream Jelly base. 2 layer coconut milk and 1 layer transparent .
- Prepare the 4 set 4Cell Ice Cream Mold and insert the ice cream stick
- Pour in 1 tbsp coconut milk layer to each ice cream mold cell. Before pour the second layer with
  transparent layer make sure the layer beneath is firm enough to hold next layer and pour the warm
  layer gently , so it  won't crossover to another layer.
- After 3 layer complete then put inside the fridge.
** Cover the mold which filling up the jelly, if not it will be a affect the jelly for following step

Filling up the others Mold
- Pour 2 tbsp transparent layer into small cup and mix with gold color then fill it into horn mold.
   After firm then take out it and put aside.
- Pour 2 tbsp coconut milk layer into small cup then use syringe with needle take out some portion
  then inject into the stamen(花蕊) of the flower mold . Then pour 2 tbsp coconut milk layer into
  small cup and mix with pink color then fill up on top of the stamen. After firm then take out and put
  aside.
- Pour 2 tbsp coconut milk layer into small cup and mix with blue and green color then fill up the 2      flower cell. After firm then take out and put aside.
- Pour 2 tbsp coconut milk later into small cup then fill up the mini leaf mold.After firm then take
  out and put aside.
- Pour 2 tbsp transparent layer into small cup and mix with charcoal powder then fill up the eyes of
   tiger mold. After firm then take out and put aside.

Assembly the whole Jelly Stick
- Pour some transparent layer and prepare the syringe with needle.
- Take out all the ice cream jelly from the mold.
- First add the horn at the top, then fix the ear by the mini leaf .
- Cut the mint color flower into half and put under the ear as the front hair of unicorn.
- Add the flower have stamen on top of the mint color flower.
- Add in the eyes at the middle point.
- After all setting, use the syringe with needle pour out some transparent layer and inject in between
  the assembly gap and the eyes part.
- After all done, cover it and put into fridge then can be served. 


中文版:
独角兽果冻棒

透明层材料:
- 1200ml 水
- 170g 糖
- 10pcs 新鲜的香兰叶(剪小段)
- 1 1/2 tbsp 燕菜粉 (用日本牌子的比较好,假如找不到可以用普通的)

椰奶层材料:
- 900ml 水
- 300ml 纯椰奶(不要参水的)
- 10pcs 新鲜的香兰叶(剪小段)
- 170g 糖
- 1 1/2 tbsp 燕菜粉 (用日本牌子的比较好,假如找不到可以用普通的)

模具和工具准备:
- 2个3D花形硅胶模具
- 2个3D迷你叶子硅胶模具
- 2个3D角硅胶模具
- 4个4排冰淇淋模具
- 32支冰淇淋棒
- 1个老虎模(仅用于独角兽的眼睛,如果可以的也可以使用)
- 1个10毫升针头注射器

做法:
透明层
- 加入1000毫升水,170克糖和香兰叶,放入小锅中煮沸
- 取一小杯,加入200毫升水和1 1/2汤匙燕菜粉,混合均匀。
- 透明水煮沸后,加入燕菜粉混合物,保持搅拌并煮约5分钟。
-  然后关闭火并将其掩盖并放在一边。

椰奶层
- 加入800毫升水,170克糖和香兰叶,放入小锅中煮沸
- 取一小杯,加入100毫升水和1 1/2汤匙燕菜粉,混合均匀。
- 煮沸后,加入燕菜粉混合物,保持搅拌并煮约5分钟。
- 然后加入300毫升新鲜纯净的椰奶混合均匀,然后放火烧开,盖上锅盖放置一旁。
**备注:加入椰奶后不要煮太久,这样椰奶和水会分开同时椰奶变成颗粒。

填冰淇淋模具
我们分3层冰淇淋果冻。两层椰奶,一层透明层。
- 准备4个4排冰淇淋模具,并插入冰淇淋棒。
- 在每个冰淇淋模具中倒入1汤匙椰奶层。在倒第二层透明层之前,确保下面的椰奶层凝固才
  倒。
-3层完成后,放入冰箱。
**把填满果冻的模具盖好,否则会影响果冻的后续步骤。

填其他模具
- 将2汤匙透明层倒入小杯中,与金色混合,然后将其填倒去角模中。凝固之后,将其取出并
   放在一旁。
- 将2汤匙椰奶层倒入小杯中,然后使用带针注射器将一部分取出然后注入花模具的花蕊。
   然后倒入2汤匙椰奶层入小杯子,与粉红色混合,然后填满花蕊顶部。凝固后取出并放在一
  旁。
- 将2汤匙椰奶层倒入小杯中,与蓝色和绿色混合,然后填满其他2朵花。凝固后取出并放在一
  旁。
- 将2汤匙椰奶倒入小杯中,然后填满迷你叶片模具。凝固后取出并放在一旁。
- 将2汤匙透明层倒入小杯中,并与木炭粉混合,然后填满老虎模具。凝固后取出并放在一
  旁。

组装整个果冻棒
- 倒出一些透明层,并备用针准备注射器。
- 从冰淇淋模具中取出所有冰淇淋果冻。
- 首先在顶部加号角,然后用小叶作为耳朵。
- 将薄荷颜色花切成两半,放在耳朵下,作为独角兽的前发。
- 加入粉丝花朵在薄荷颜色花朵上。
- 在冰淇淋中间点添加眼睛。
- 完成所有设置后,使用带针头的注射器倒出一些透明层,然后将其注入装配间隙和眼睛部
  分。
- 完成所有步骤后,盖上盖子放入冰箱,即可食用。

Tuesday, 5 March 2019

Flower Swiss Roll at Good Times DIY & Lifestyle Cafe at MyTown

This was my second time visit Good Times DIY. My friend still have leave over coupon and ask me company here to learn baking.

I like to eat Swiss Roll , so i choose the Flower Swiss Roll as today topic. It so easy.

  Ingredient for drawing (A) :
- 20g Cake Flour
- 20g Icing Sugar
- 3pcs Egg
- 20g Unsalted Butter

Ingredient for Swiss Roll (B) :
- 90g Cake Flour
- 38g Caster Sugar
- 38g Caster Sugar
- 45g Corn Oil
- 75g Water
- 3tsp Vanilla Essence

Ingredient for filling cream (C) :
- 25g Caster Sugar
- 150g Whipping Cream
Instruction drawing :
1. Separate the egg white and egg yolk into the small bowl.
2. Then measure 20g egg white to use and the balance keep for later
3. Soften the unsalted butter , then add in the (A) cake flour, icing sugar and the 20g egg white.
4. Whisk until well incorporated. After separate into 3 bowls, add in red colour, yellow colour and chocolate , then mix well .
5. Put into 3 piping bags.
6. Prepare the swiss roll baking pan with baking paper.
7. Draw the flower pattern using the coloured cake batter. After keep it inside the fridge.

Instruction Swiss Roll :
1. Put 3 egg yolk into mixing bowl, then add in 1 portion caster sugar and mix by using whisk until it turns light yellow colour.
2. Slowly add in water and keep mixing.
3. Slowly add in corn oil and continues mixing.
4. Add the sifted cake flour and mix well until mixture look smooth.
5. Last add in vanilla essence and mix well , then put aside.
6. Put the balance egg white into mixing bowl and beat with high speed 6 with 30 sec
7. Add in caster sugar by 2 times and beat until stiff peak. ( 1/2 with 6speed with 30 sec /  1/2 with 6 speed with 1min / last speed with 4 speed with 30sec )(have to foamy like ice cream )
8. Slowly add in egg white mixture into the flour mixture by 3 time. Mix gently with a spatula. ( Use J type turning bowl method to mix well )
9. Pour the mixture into the swiss roll baking pan with drawing, then use scrapper to smooth the surface.
10. Tap the cake pan on table to remove the air bubbles.
11. Place into lower middle level of preheated oven bake 15 to 18 min with 170.

Instruction filling cream :
1. Add in caster sugar and the whipping cream to beat with high speed 8 with 2min30sec

Combined Instruction :
1. Remove the cake from oven and let it cool down.
2. Turn the cake to the new baking sheet and remove the old one .
3. Turn again to another new baking sheet. ( the drawing pattern must at bottom )
4. Apply a thin layer of cream on the full piece of cake
5. Roll up the cake slowly with gentle action.

Sunday, 12 August 2018

Korean Buttercream Flower CupCake

Recently Korean Buttercream Flower so popular . My best friend and me also take a short class to learn the basic type. One of my friend recommend Peggy's Cupcakery( Peggys-Cupcakery ) to me and the price reasonable. 

Peggy's Cupcakery is a home-base baking class and located at Cheras Jalan Kencana. She not only teaching the Korean Buttercream Flower, she also teach Beanpaste Flower, Candle Flower,Wagashi Class,Jelly Ceram, Madeleine tower and Macaron. 

Before start make the Buttercream Flower, have to prepared the cup cake and the butter cream . The below are the ingredient which provide by Peggy. 

Chocolate Cupcakes ( 12 serving)
- 1cup All Purpose Flour
- 1/2 cup Rich Cocoa Powder
- 1/2 cup Sugar
- 1tsp Baking Powder
- 1/4 tsp Baking Soda
- 1/2 cup Sour Cream ( Plain Yogurt also can)
- 1/3 cup Milk 
- 1/2 cup Brown Sugar
- 1/4 cup Vegetable oil
- 1 Egg 
- 1/2 cup Chocolate Chip

Or using the ready Mix Cupcake mixture
- 500g Cupcake Mixture
- 4pcs Egg
- 180g Melt Better
- 100g Water
- 50g Low Protein Flour (Optional ,this will make the cupcake moist )

Instruction : 
**If you wish to have flat cupcake and not much raise, no need to preheat the oven. Otherwise preheat the oven.
- Sifted all the dry ingredient 
- Add in others ingredient and mix it well.
- After mixture mix well, take a ice cream scoop into cup cake cup
- Place the cupcakes into oven for 25 to 30 min
** Stored at the room temperature and can keep in an airtight container for up to 2day

Buttercream (enough for 8 to 9 Style)
- 230g Butter 
- 2pcs Egg white
- 30g sugar
- 60g sugar
- 25g water

Instruction : 
- Add 60g sugar into water and use medium fire to boil
- Beat the Egg White with high speed until be white bubble
- Add 30g sugar into egg white mixture and continues until the egg white mixture be straight up.
- Quickly add in the boiled sugar water and beat about 10min. 
- After put in fridge about 15min
- Take out and add in the butter, beat until smooth
** when the time add in butter and beat, you will see the egg white no more straight up and feeling like melt, don't worry about that, just keep use high speed beat until smooth. 


After the cupcake and buttercream get ready , then can start the Flower workshop. Peggy also prepare some tools for us during the class and after class we also can bring the tools back. She prepared the icing piping nozzles,Plastic Scissors Flower and flower Stand Cake Decor Tool.

                           
The first flower type which Peggy teaching us is Rose. We have to make 6pcs small rose and 3 pcs big rose. For making Rose, we have to use the icing piping nozzles #127 size.
 
 **The above picture is which i get from internet. **
 **The above picture is which i get from internet. **
Instruction for small rose
- Take the plain buttercream and add in the color which you like for the rose and put in the pastry bag.
- Take the flower Stand Cake Decor Tool squeeze small amount cream as based. 
- Hold the direction of icing piping nozzles #127 , the sharper place on top and big hold at bottom 
- Slowly Squeeze 2 petal , then following by 3 petal and last by 6 petal.
  (Remember when the time squeeze the petal 1st layer is straight, 2nd later a bit curl then the last 
   layer also a bit curl.) 
- Use the plastic scissors flower,cut it down and arrange on the tray 
- Put the fridge for chill up and set the shape

Instruction for big rose 
- When squeeze the last layer , have to stick on the bottom squeeze, so the petal will look like open
- Use the plastic scissors flower,cut it down and arrange on the tray 
- Put the fridge for chill up and set the shape

If wish to have video can go to Buttercream Rose

How to set the Buttercream Flower on top of Cupcake? We have to prepare another icing piping nozzles and the leaf color buttercream . We have to use #352 icing Piping nozzles .
        
**The above picture is which i get from internet. ** 
 **The above picture is which i get from internet. **

Instruction to set the Small Buttercream Rose on top of Cupcake:
- Take the balance buttercream of the rose, squeeze 1 point at middle of cupcake and others 5 point 
  around the middle point.
- Use the plastic Scissors Flower slowly take up the buttercream Rose and set on top the middle point 
  and others 5 point. ( if feel the cream not enough to stick it, can squeeze little bit more.)
- After use the leaf buttercream with Icing Piping nozzles #352 squeeze from the gap in between the 
  middle rose with others. 
- Remember when squeeze the leaf, the nozzles must face like shark mount. Then squeeze , hold and 
  pull out. Then the leaf will be look nice. 
- Then can put back to fridge 


Instruction to set the Big Buttercream Rose on top of Cupcake:
- Take the balance buttercream of the rose, squeeze 3 point at cupcake .
- Use the plastic Scissors Flower slowly take up the buttercream Rose and set on top of the point 
- After use the leaf buttercream with Icing Piping nozzles #352 squeeze 3 leaf from the middle gap 
   then also squeeze at the bottom also .
- Remember when squeeze the leaf, the nozzles must face like shark mount. Then squeeze , hold and 
  pull out. Then the leaf will be look nice. 
- Then can put back to fridge 


Buttercream Sunflower 
- Prepared 2 pack buttercream, 1 pack for sunflower color with Icing Piping nozzles #352 and others
  pack for the middle seed color with a small cutting hold.
- Take a cupcake and apply some plain butter cream on top (This for easy to squeeze the sunflower
  on top of cupcake.
- Start squeeze the sunflower petal from the corner by using sunflower color with Icing Piping
   nozzles #352
- Second layer squeeze a round on the petal bottom then only continues squeeze the second
  layer petal.
- After the middle using another pack middle seed color with a small cutting hold squeeze the seed.
- Then can put back to fridge


Buttercream Pincushions Flowers Cupcake
- Prepared 2 pack buttercream, 1 pack for Pincushions  Flower color with Icing Piping nozzles #127
  and others pack for the middle seed color with a small cutting hold.
- Take a cupcake and apply some plain butter cream on top (This for easy to squeeze the Pincushions
  on top of cupcake.
- Start squeeze the Pincushions petal from the corner by using Pincushions  Flower color with Icing       Piping nozzles #127, continues draw a  "M" shape petal on first layer.
- Second layer squeeze a round on the petal bottom then only continues squeeze the second
   layer petal and continues with third layer.
- After the middle using another pack middle seed color with a small cutting hold squeeze the seed.
- Then can put back to fridge


Buttercream Folding Flower cupcake
- Prepared 2 pack buttercream, 1 pack for folding Flower color with Icing Piping nozzles #127
  and others pack for the middle seed color with a small cutting hold.
- Take a cupcake and apply some plain butter cream on top (This for easy to squeeze the folding
  Flower on top of cupcake.
- Start squeeze the folding  Flower petal from the corner by using folding Flower color with Icing
   Piping nozzles #127 continues draw a  "Love" shape petal on first layer.
- Second layer squeeze a round on the petal bottom then only continues squeeze the second
   layer petal and continues with third layer.
- After the middle using another pack middle seed color with a small cutting hold squeeze the seed.
- Then can put back to fridge

Buttercream Hydrangea Cupcake
- Prepared 3 pack buttercream, 1 pack for Hydrangea color with Icing Piping nozzles #352 and
  1 pack for the middle seed color with a small cutting hold and 1 pack for leaf color with Icing
  Piping nozzles #352
- Take a cupcake and apply some plain butter cream on top (This for easy to squeeze the Hydrangea
  on top of cupcake.
- We need squeeze 4 petal to set One Hydrangea .We have to squeeze the whole cupcake until don't
  have much space by using Hydrangea color with Icing Piping nozzles #352.
- After we middle seed color with a small cutting hold ,squeeze the seed.
- Last, we use leaf color with Icing Piping nozzles #352 squeeze the leaf on the gap in between the
  flower
- Then can put back to fridge

Buttercream Cherry Blossom Cupcake
- Prepared 3 pack buttercream, 1 pack for Cherry Blossom Flower color with Icing Piping
  Nozzles  #127 and 1 pack for the middle seed color with a small cutting hold and 1 pack for leaf
  color with Icing Piping nozzles #352.
- Take the flower Stand Cake Decor Tool and add the cutting paper. ( this for easy the move the
  flower to cupcake)
- We need 5 petal to set one cherry blossom then use middle seed color with a small cutting hold
  squeeze the seed.
- Use the plastic scissors flower,cut it down and arrange on the tray 
- Put the fridge for chill up and set the shape

Instruction to set the Cherry Blossom on top of Cupcake:
- Take the balance buttercream of the cherry blossom, squeeze 1 point at middle of cupcake and 
   4 point around the middle point.
- Use the plastic Scissors Flower slowly take up the buttercream cherry blossom set the 4 point first
  then the last on the middle point.
- After use the leaf buttercream with Icing Piping nozzles #352 squeeze from the gap in between the 
  middle rose with others. 
- Then can put back to fridge 

   
  **The above picture is which i get from internet. **

Buttercream Chrysanthemum cupcake
- Prepared 3 pack buttercream, 1 pack for Chrysanthemum Flower color with Icing Piping
  Nozzles  #79 and 1 pack for the middle seed color with a small cutting hold and 1 pack for leaf
  color with Icing Piping nozzles #352.
- Take the flower Stand Cake Decor Tool squeeze small amount cream as based.
- Then start using Chrysanthemum Flower color with Icing Piping Nozzles  #79 from bottom pull up.
- Need about 3 layer to set Chrysanthemum Flower .
- Then use middle seed color with a small cutting hold squeeze the seed .
- Use the plastic scissors flower,cut it down and arrange on the tray
- Put the fridge for chill up and set the shape

Instruction to set the Chrysanthemum on top of Cupcake:
- Take the balance buttercream of the Chrysanthemum Flower, squeeze 1 point at middle of cupcake 
   and 4 point around the middle point.
- Use the plastic Scissors Flower slowly take up the buttercream Chrysanthemum Flower on middle
   point then flowing to other point. 
- After use the leaf buttercream with Icing Piping nozzles #352 squeeze from the gap in between the 
  middle rose with others. 
- Then can put back to fridge 


Saturday, 9 June 2018

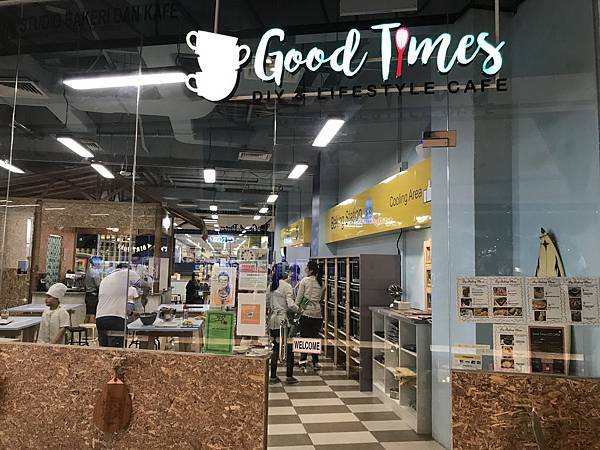
Good Times DIY & Lifestyle Cafe at MyTown

Do you hear about  'Good Times DIY & Lifestyle Cafe' in My Town? That was my friend asking me. 
She said that this not only a cafe, it also a baking workshop.

Last weekend i went there with her to check it out, what the news things there.
'Good Times DIY & Lifestyle Cafe' is offers baking workshops to adults and children alike. The provide a all the raw ingredients and the baking appliances for the customer and customer can select from the list and bake by themselves. Besides that, they also hosts events such as birthday parties, and school baking workshops. 

All the tools and baking ingredients are arranged very tidy and we can easy to take it by ourselves. 
The baking station arrange at another side of the cafe.

This are the main menu of their baking workshop. There have 3 different type to let customer choose. You select from the easy level to advanced level. Of course the price also will be different.  You also can like their FB page to see there have any new menu add in or not.


We select the intermediate level 'Cookies n Cream Chocolate Torte '. They assign a staff to lead us from picking up the raw ingredient , mix the mixture, beat cream , bake the cake and decoration.
               
When the time baking, we can walk around the more or have a cup of coffee chit chat at the cafe also.
Deng Deng Deng Deng......My 'Cookies n Cream Chocolate Torte' done. After done, the cafe prepare the cake box for us bring back as well. i bring it to my brother family to share the cake. Is so delicious, my niece and nephew like it. (Maybe is chocolate, that why they like it )


The following link is the ingredient and the instruction . cookies-n-cream-chocolate-torte-cake

Good Times DIY Baking & Lifestyle Cafe
L2-052, MyTOWN Shopping Centre,
Jalan Cochrane,
Kuala Lumpur.

Tel: 603-2778 4357
Facebook: @GoodTimesDIYBakingCafe

Cookies n Cream Chocolate Torte Cake

Cookies n Cream Chocolate Torte Cake which learn from baking workshop at  'Good Times DIY & Lifestyle Cafe' ,MyTown .
Ingredient :
- 1tbsp Cake Flour
- 40g Cocoa Powder
- 90g Milk Chocolate
- 40g Dark Chocolate
- 3 pcs Egg
- 60g + 60g Caster Sugar (2 different bowls)
- 100g Unsalted Butter

Instruction :
- Separate the 3 egg yolk and egg white , then set aside.
- Sift the cake flour & cocoa powder together and put aside.
- Prepare 7-inch round cake mould and coat with a thin layer of butter and put the parchment paper
   at the bottom and side.
- Melt the milk Chocolate and dark chocolate together in a microwave .
- Add the melted chocolate into sifted mix flour mixture and mix it well.
- Whisk the egg yolk and 60g sugar in another clean bowl and mix until the colour
   turn to light yellow.
- Add in the egg yolk mixture to the chocolate flour mixture and mix it well , then put aside
- Beat the egg white with 6 speed with 30sec
- Add in 30g sugar and use speed 6 beat 1min,  then add another 30g sugar use speed 8 beat 1 min
- After use 4 speed beat another 1 min.
- Then slowly add the egg white in the chocolate mixture.Remember mix in the same direction .
- Pour the well mixed mixture into mould and put in preheat oven bake about 40min with 170'

Cream Ingredient :
- 100ml Whipping Cream
- 20g Oreo Crushed Cookies
- 10g Caster Sugar

Instruction :
- Add in the whipping cream beat about 1min with 8 speed
- Then add in Oreo Crushed Cookies beat 30 sec with 4 speed

Decoration Ingredient :
- Strawberry
- Oreao Cookies
- Icing Sugar

Instruction :
- After the cake baked and cold down then can start decorated.
- Put the cream on top of the cake
- Add the strawberry, Oreo cookies onto the cream , also sprinkle some icing sugar as well.

Sunday, 5 November 2017

May's MaryKay Beauty Class

Today I get to know some Mary Kay product and some basic makeup. Really thanks to my Zumba Instructor Ms. May invite me to join this beauty class. Ms. May is not only a Zumba Instructor, she also a beauty consultant in Mary Kay company. She has a lot of beauty class to sharing, like make up classes, facial classes, product knowledge class and etc.
                                               
Ms.May
Some Mary Kay Product

At the first, we have to get to know some history of Mary Kay. Mary Kay is based in Addison, Texas and this company was founded by Mary Kay Ash in 1963. Basically Mary Kay they can skin care product, make up product, men’s care product, body care product & fragrance product.

Today the beauty class topic is basic make up. Before we start make up, we must understand what type of skin we are then only can choose the correct make up product to use. After that, we only can start it with Foundation.

Foundation part
CC cream, Powder foundation ,we have to use middle & ring fingers slowly push it down all the foundation. Then following by undereye Corrector to cover the darker eyes.

Eyes Part
Eye primer to extend the wear of eye color, preventing it from smudging. The choose the suitable Eye color like smokey eyes, you have to apply light, middle and dark color around the eyes.
Eye Brow have get the 3 point before you start drawing which is begin brow, point of arch & end brow. Then join up this 3 point, you can easily to draw your eyes brow.
Eye Liner also part of it, to let's your eyes look bigger.

Cheeks Part
Highlighter color and soft color mix together to brighter up and let you have three-dimensional sense.

Apply lipstick and do some final touch up, then you will have a completed make up.

             
                           Before Make up                                                 After Make up